Monday, February 24, 2014

LP Jr (or Six) Fretwork

So I'm closing in on the end for the LP Jr project. I've decided to refer to her as Six now, since she will be the sixth guitar that I've completed.

I have a few more tasks to complete before I can begin finishing the body. I wanted to get the frets seated and level them first. I had to bend the frets to tighter radius than the fretboard. The fretboard is a 12 inch radius (matching the bridge.) I bent the frets to close to 10 inches.


I over bend the frets because I will be using a hammer to seat them.  As the hammer forces the frets into the slots it also flattens the radius.


With all the frets in place its time to clean things up.


First, I remove the overhanging edge pieces with a flat nose wire cutter.


Then I use a fine file, smooth the edges even with the side of the fret board. (I didn't take pictures of this portion of the process. I promise I will do that on my next build.) After the edges are smooth. I turn my file to a 30° angle and run it over the edges again, taking off more of the fret edges. This makes for a smoother playing neck.

Next, it's time to level the fretboard. First I tighten the truss rod slightly (maybe a quarter turn.) I take 320 grit sandpaper on my 12 inch radius fretboard leveling block and level the neck. This flattens the frets taking off any high spots. While doing this I will hold a straight edge to the frets looking for high spots that need more attention.

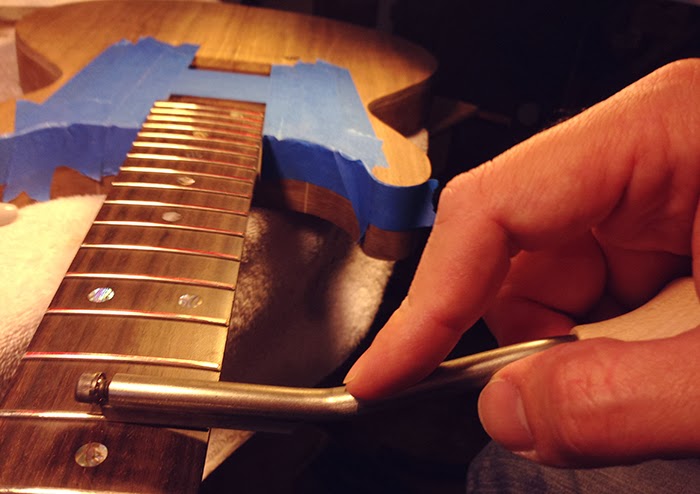
After I level the fret board it's time to put a crown back on the frets, or round their edges. First, I use a Sharpie marker on the flat edge of all of the frets, this helps me view my progress. (Yes, I did slip and mark up the fretboard at the 24th fret. I'll have to sand that mark off later.)


Next up, I use my fret file. It is a concave file that will round the tops of the flattened frets. By checking regularly I can watch the red marker slowly disappear leaving a round yet rough fret.


Next up I use 400 grit sand paper with a school eraser as a sanding block to take out some of the roughness. I use a metal fret guard to keep from scratching up the fretboard. I will polish the frets after I finish the body.


So now it's time to put everything together and see just what she's going to look like, and test how well she'll play.

I place al of the electronics in the rear cavity. This is a tight fit. On future builds I will route a larger electronics cavity.


The switches and knobs are a little closer than I would have liked. This would have worked out fine, except that I wanted to add two there-way coil tap switches for the pickups. I used two on/off/on DPDT switches for a Series/Single/Parallel wiring for each pickup.


Finally, it's time to string her up and see just how she plays. While most people might find the neck to be a little thick at the nut, I find that I like it that way.
I'll upload a video of me playing the guitar acoustically in a couple of days. It sounds and plays great, even at this rough stage.


I'll upload a video of me playing the guitar acoustically in a couple of days. It sounds and plays great, even at this rough stage. 

Next up, I will block sand the body flat, and seal the walnut pores with shellac. I mixed up a nice thick  4 lb. cut of shellac tonight. I had to go back and re-read this post in order to make sure that I had the correct ration of flakes to alcohol - 4 oz of shellac flakes mixed with 8 oz of alcohol. 

Sunday, February 9, 2014

LP Jr. - Neck Pickup Route

This is a rough mock-up after today's work. I placed the chrome hardware in order to see how this will eventually look.


Now for today's work - routing the neck pickup cavity. This route on the Jr. presented a special problem. Because this is a set neck with a 4° tilt, the standard Stewart McDonald humbucker routing template would not easily fit over the top of the body. There were a couple different possible work arounds. The one that I chose was to build a custom template out of scrap wood. 

First, here are some photos showing the nature of the problem.


As you can see, in order to use the StewMac template, I would have had to cut it to fit around the neck. But that still would not solve the problem with the thickness of the template. The fretboard sits almost 3 mm higher than the template. 

So the solution would be to use a scrap piece of wood and cut a custom template.

The scrap wood sits a safe 4 mm higher than the fretboard. I then use the StewMac template to cut my own template.


I drilled two large holes before routing the template.


I then measured off width of the base of the fretboard.


I then cut into the template, so that I could fit it around the fretboard. I cut a center piece to help with deep routes for the pickup screws, brackets and springs.


One of the other obstacles for the neck pickup route was the overall depth. The neck tendon under the the curly walnut top is about 1 inch thick. I wanted to leave as much of this tendon in tack as possible. The top is about 1/4 inch thick. The screws and brackets need a depth of about 1 inch, but the pickups will only need about a half inch. So the wood block is placed in the center to control the amount of routing I do on the edges. After routing those two areas to slight deeper than 1 inch. I removed the bock and routed the rest of the pickup cavity to about 1/2 inch.


After today's work, I have roughly just under 40 hours in this project.

Wednesday, February 5, 2014

LP jr - sanding, bridge and pickup route

So I've gotten quite a bit done in the last couple of weeks. First I sanded the body and neck to 220 grit. The details are really showing up nicely. The pin-stripe maple veneer really jumps out on the body.


Yes, I used two pieces of veneer on the neck laminates. In addition to the maple veneer, I used walnut veneer to accentuate the the lighter center curly walnut piece.


Then I positioned the bridge. In order to do this I strung-up both E-strings with dental floss. I lined up the floss with the sides of the neck. Because this isn't rocket science the center of the bridge position needed to be nudged about 1 mm above the center line. This movement of the bridge will not be visably noticeable to the naked eye. I also used a shim to check the overall string height of the bridge.


And finally, on Sunday, I routed the first of two pickup cavities. The cavity for the bridge pickup was a straight forward route. I just need to line the template up with the bridge. The neck pickup route will be more complicated as I will need to cut a template to fit around the base of the neck and it will have to sit higher for me to execute the route without damaging the neck. I will take plenty of photos in order to document this process.