Monday, March 26, 2012

2012 TDPRI Tele Build Challenge - gluing fretboard and cutting headstock

Over the weekend I worked on gluing the fretboard to the neck, shaping the fretboard to the profile of the neck and shaping the headstock.

In order to help properly glue the fretboard to the neck I used a technique that involved drilling small holes in fret slots and using straight pins. The line on the left of the is the position of the zero fret. In order to line this up properly I drilled two small holes in the zero fret slot. Pushed the straight pins through, lined them up on the line on the neck, then drilled tow small holes there as well. I repeated this process at the twelfth. I checked the placing of the straight pins, measured their distance to make certain thy all matched up.


I removed the fretboard and pins and covered the neck with Titebond glue (removed the masking tape that protected the truss-rod.) I then carefully placed the fretboard over the neck lining up all of the straight pins. This was followed by my somewhat obsessive clamping process (this is actually fewer camps than I used on previous necks.) I allowed this to dry for about an hour, then removed the clamps. I then called it a night.


The next day I used my table router to clean up the edges of the fretboard and cut it flush to the neck. I followed this by sanding the headstock smooth to 120 grit and cut it's shape.

Saturday, March 24, 2012

2012 TDPRI Tele Build Challenge - Day 3

So I had help in the basement today. That's Scout and she's inspecting the cut of the fretboard.

Before cutting slots for the frets I marked the depth of just under 3mm on the side by each cut I planned to make.

After cutting all the slots I cut the fretboard to just slightly wider than the neck. I will clean this up with a router.

Friday, March 23, 2012

2012 TDPRI Tele Build Challenge - Fretboard choices


So for the past couple of weeks I have been thinking about what would be an appropriate fretboard for this build. I knew that I wanted something that went well with the curly maple top I was planning on using. But I just wasn't happy with the wood I had lying around. 
The first thought I had was the curly maple at the top of this first frame. I liked it alot but it just doesn't feel dramatic enough to me. The flame maple at the bottom of the frame is from the same batch that I'm creating the neck out of, but it doesn't compliment the figure or tone of the top.

I considered (briefly) a bird's eye maple. Then I decided to give the local wood store another try.


That's where I found this 1/4" board. I like how the tightness of the grain matches the center of the book-matched top. The figure is running on a slight angle to the edges. I will cut it so that grain follows the center line. Bellow, I've taped off the edges just so that  I could get a good sense of what this would look like once I cut it. I'll also have to do something about the slight differences in color. The fretboard is slightly redder than the top.

Sunday, March 18, 2012

2012 TDPRI Tele Build Challenge Day 2

Very productive day in the basement today. I have made great progress on the neck today. First I cut the head stock down to slightly larger than 1/2" removing excess wood. Late I will use a router to plane this to a thickness of about 1/2".

After  drawing the basic shape of the neck, I cut to just outside the lines.


I used double stick tape to secure my jig to the neck blank. And then used a table router to clean up the sides.


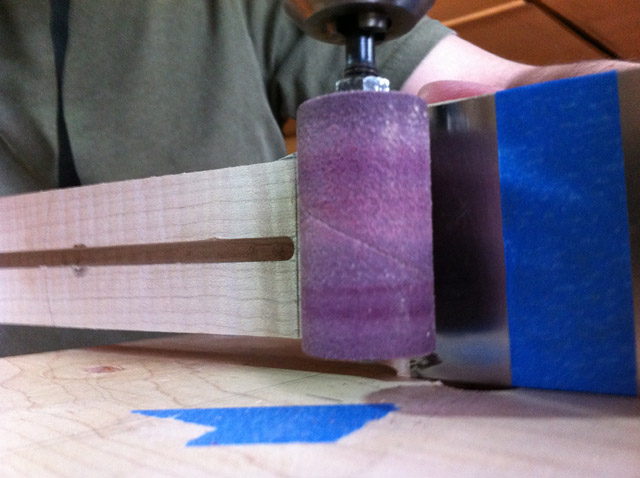
Next I used a curved router bit to shape the space where the headstock will meet the fretboard. After routing I taped a metal scraper to the head stock and moved on to a sanding bit on the drill press.


This gives me a nice curve from the headstock to the face of the neck.


Next up, I glued extra wood to the edges of the headstock to help it take shape. I used Titebond and several clamps to hold the wood in place. I used clamped both the neck and the extra wood to the table in order to ensure that the wood be flat across the back.


After the glue cures overnight, I will be able to cut the shape, plane the surface and drill holes for the tuners. I've also prepped a miter box for the fret board which I hope to work on this week. I am surprised at how quickly this has progressed, I have spent less than 8 hours over two days this weekend working on the neck.

Saturday, March 17, 2012

2012 TDPRI Tele Build Challenge

For the next two months I will be taking part in the 2012 TDPRI Tele Build Challenge. For me the real challenge will be attempting to complete the Tele.

The guitar will be a three piece maple back, with a book-matched curly maple top. Between each of the three back pieces and the top will be a thin mahogany veneer. The neck will have a maple flame on the back with a curly maple fret board.

I began the project Saturday March 17th.

First I sketched out on the body blanks the Tele shape using a template as a guide. I also sketched the basic shape of the neck with a center line for the truss rod channel.


Before routing the channel for the truss rod. I drilled 1/4 inch holes at either end of the line for the truss rod. The depth of each hole was 7/16th deep.

In the past I had tried a couple different methods for routing the truss rod channel. Including using a router table and a fence and building a jig to hold the router still. I've since discovered that the easiest method is clamp a guide and the neck to the edge of a table with the guide exactly 2 inches away from the center line.


 There is, however, one problem with this method. Because the edge of the neck is so close to end truss rod hole, I was not able to finish all the way to the edge. Instead, I made four passes as far as I could go. Then I re-clamped the neck blank on the completed side. Removed the tow end clamps. And re-measured the distance from the guide to the center line, carefully adjusting the necks so that everything properly lined up.


This is the cleanest truss rod channel I have cut to date. Next up I will glue edges to the headstock and cut y fretboard.

Sunday, February 26, 2012

The Headless Body

This represents two weekends worth of work on the headless body. The photo to the left is where the where I stopped Sunday evening. Below is documentation of the progress that got me there.

I started by routing holes in the ash back for the wiring. Then I glued two pieces of curly maple together with a center piece of pau ferro. I cut small grooves on the sides of the maple for clamping. After the maple and pau ferro dried, I glued mahogany veneer to the back.


After the top dried, I glued it to the body. There was about a half inch of overhang on the sides. This was intentional. Later, I cut these edges close to the body, then I routed the edges flat.


The top and the edges are still ruff at this weekend. I started this weekend by using my router to plane the top of the body. I then used the orbital sander to sand from 80 grit to 220 grit. 


After planing and sanding the top, I used the router to smooth and straighten the sides. Here you can see the thin mahogany veneer sandwiched between the ash back and the maple top.  


Here the new headless body sits next to the old Steinberger P-Series body I won on eBay last year. The dimension on mine are slightly longer than the Steinberger. This is to accommodate the neck dimensions. I did not have plans for the neck, so I really was working from scratch on this build. Visually, the only Steinberger aficionados will notice. 


Next weekend, I will cut the rear to match the Steinberger body and route the neck pocket and perhaps pickup and the electronics cavity on the back.

Tuesday, February 21, 2012

Firebird Progress


Great progress on the Firebird this past weekend. First I spent an entire morning sizing up the route for the neck pocket. Because I was widening the existing route by less than 2mm on either side, I was running into trouble with lining up the the jig for the route. I tried three different methods before settling on using an existing jig. In order to achieve the 4˚, I used shims and double stick tape to raise one side of the jig.

The indention in the photo of the neck pocket was created by accident when my router lowered without warning. This happened because the collar holding it at the proper height was not tight enough. I have since taken to tightening the collar using a ratchet set after locking it in the appropriate height. I should be able to sand this indention slightly by hand. And it will be hidden by the neck once it is place.

After routing the the neck pocket I was able to determine the location of the bridge. The tail piece (if I use one instead of a Bigsby) will be far enough back that I can reach the appropriate location with the drill press after gluing the wings on.

Before gluing the wings to the center piece, I drilled a few holes for wiring tow pickups and the bridge ground wire. The holes lined up with the channel that I routed before gluing the curly maple tops to the wings.

The wings were then glued to the body one wing at a time. I discovered after gluing the top wing that if I masked of the wood close to the edge I could easily remove excess glue without having to use a scraper.
After allowing the glue to cure over night I cut off the excess wood from the center piece with the band saw. The body is now ready for me to route the pickup cavities (see photo at top of this blog post.)

Sunday, February 5, 2012

Side Dots and Neck Shaping

The holes for the side position markers have been drilled and the dots places. On the Headless neck I used a 3/32" bit for the slightly larger white dots. On the Firebird neck I used a brad point 2mm bit. I think I prefer the slightly larger bit. Unfortunately the 3/32" bit is not a brad point and has a tendency to drift slightly causing the dots to be drilled slightly off from the desired spot.
On Saturday I carved the back of profile of the headless neck. I started our using a microplane at two spots on the neck, behind the 1st fret and about 4 inches from the base. Then I used a rasp to smooth out the wood. After I finished the two spots on the neck I used a spoke shave to remove wood between the spots I worked on. After taking off the excess wood I used a fine rasp to smooth the wood. Once I finished the rough profile, I proceeded to sand paper, first 80 grit then moving on to 220 and ending with 320. This is still a rough neck and will require more sanding to even out the profile.

On Sunday, I worked on the Firebird neck. I went through the same process as I did above with the Headless neck. Pictures are below.