Now that it's completed, I brought Number 6 in to the Photo Studio on Friday.
Specs:
24.75 inch scale
3 piece Walnut back
Book-matched Curly Walnut
Thin Maple veneer separating the Walnut on the body
Katalox fretboard
3 Piece Set Walnut Neck
24 fret neck
Zero fret
Seymour Duncan JB and Jazz Humbuckers
3-way pickup selector
2 Series / Parallel Switches
Showing posts with label Number 6. Show all posts
Saturday, September 6, 2014
Number 6 - Fret Job
So in adition to having problems with the shellac finish, I also was not happy with the overall string height on Number 6. Unfortunately when I lowered the bridge, I discover that I had fret buzzes on the high E and B strings at the 7th and 8th frets. first I tried dealing with the buzz by going after the culprit - the 9th fret. I lowered, leveled, crowned and polished that fret. This cured the problem with the buzz at the 7th and 8th frets... but created a bus at the 9th fret, caused by the 10th fret... so i corrected that problem and... well, you can guess where this went. I was chasing a fret buzz.
I decided to take a different approach to fixing this problem. Armed with my copy of the Stew Mac 2nd Edition on Fret Work, digital calipers, a fret rocker, a fret dressing stick (sand paper), a fret crowning file, an iPad with Apple Numbers, and a finger-nail buffing block (found at the local drug store), I got to work on Number 6's fretboard.
I removed the strings and then used the digital calipers to take three measurements of each fret, on the high-E string side, one in the middle and one on the low-E string side.
I added all of this information into a spreadsheet on my iPad. I then created a chart showing the largest deviations between frets. This helped me come up with a plan of attach.
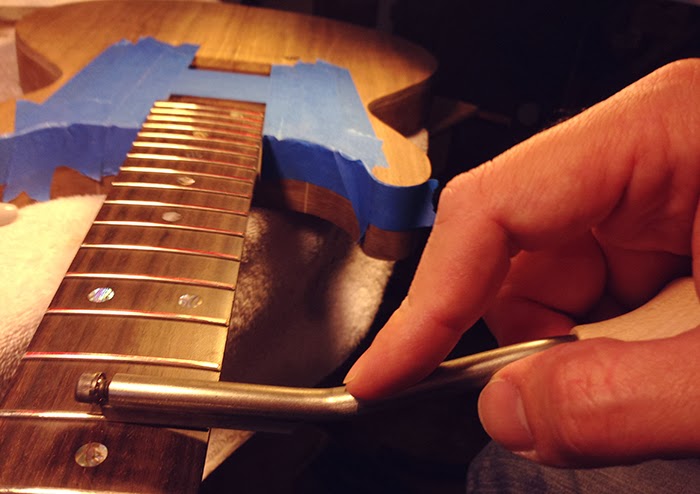
After pinpointing the problem frets on the chart, I taped off the fretboard and marked the tops of the frets with a red Sharpie marker. I then use the fret dressing tool to slowly sand the tops of the frets.
I decided to take a different approach to fixing this problem. Armed with my copy of the Stew Mac 2nd Edition on Fret Work, digital calipers, a fret rocker, a fret dressing stick (sand paper), a fret crowning file, an iPad with Apple Numbers, and a finger-nail buffing block (found at the local drug store), I got to work on Number 6's fretboard.
I removed the strings and then used the digital calipers to take three measurements of each fret, on the high-E string side, one in the middle and one on the low-E string side.
I added all of this information into a spreadsheet on my iPad. I then created a chart showing the largest deviations between frets. This helped me come up with a plan of attach.
After pinpointing the problem frets on the chart, I taped off the fretboard and marked the tops of the frets with a red Sharpie marker. I then use the fret dressing tool to slowly sand the tops of the frets.
After sanding the frets, I check the fret height with the calipers. Then I use the fret rocker to check the height of the filed fret in relation to the fret immediately before and after the filed fret. If the rocker lays flat against all three frets, I mark the completed frets with a green Sharpie marker and move on to the next fret.
Once I've leveled all of the high frets, I use the fret crowning tool to round the top of the frets. I follow that by polishing the frets with the four-sided finger-nail buffing block. After completing all of the frets, I remove the tape, string Number 6 up again and test the frets.
Wednesday, July 16, 2014
Number 6 - the Jr has been completed... and then trouble
A couple weeks ago, I completed Number 6, the Jr. The guitar has two Seymour Duncan pickups, a JB and a Jazz. the pickups are both wired for series/parallel dpdt switches.
I rushed completion of the guitar so that I could bring it with us on a trip to visit family and friends. In the days following the completion I brought the guitar upstairs and hung it on the wall.
...and played it several times before starting our trip.
So the guitar traveled in a standard gig bag in the back of a car for about a 30 hour road trip over 10 days. While the heat was partially to blame, the reality was that I did not allow the shellac enough time to cure in a dry location. As a result the gig bag left some impressions on the finish.
...as did the wall hanger.
...dings also set in.
So, I now had to take a couple steps back. First, I turned on the dehumidifier in the basement and set it to 35%. Next, I sanded the marks up areas of the body with 400 grit wet (using mineral spirits not water) sand paper. Then I began french polishing again, just the affected areas. Now that this is done I will run through the sanding and final polishing steps in a couple of days. The shellac should be hard enough now to not mark up so easily.
Labels:
curing,
curly walnut,
dehumidifier,
DPDT switches,
french polishing,
Junior,
Les Paul Jr.,
LP Jr,
mistakes,
Number 6,
Series/Parallel wiring,
Seymour Duncan Pickups,
shellac,
shellac problems,
walnut
Saturday, June 14, 2014
French Polishing the Junior
The French polishing process is not terribly complicated. First I create a pad by wrapping a small piece of wool with a square of cotton cloth. I soak the wool with shellac and alcohol. The proportion changes depending on where I am in the process. When starting out I use just a 3lb. cut of shellac. As I apply more coats I start using more alcohol. For the last couple of coats I only use alcohol.
After soaking the wool, I apply a small amount of mineral oil to the outside of the cloth. The oil lubricates the surface keeping it from heating up as I apply the shellac.
I rub the pad over the wood in a circular motion, being careful to glide the pad onto the surface and then gliding off. I never stop moving on the surface.
Early on, ridges will develop, don't worry. Shellac will continue to flow as it dries. With each pass the coats blend together. Increasing the alcohol helps soften the rough edges eventually creating a smooth surface.
After about every three or four coats, I flat sand with 320 grit wet/dry paper and use mineral oil to keep the sand paper clean.
For this build I spent far more time on the shellac process than I wanted. I'm still quite the novice at French polishing
Now that the surface is smooth I drop in the pickups and place the bridge to make sure everything fits, before moving on to final sanding and polishing.
For sanding I run through wet sanding with mineral oil, starting with 400 grit moving onto 800, 1000, 1500 and finally 2000 grit. I then begin the polishing process with a 4F Pumice Stone mixture. I apply with the grain, rubbing the mixture into the finish. I then wipe it off in the same manner with a clean cloth moving with the grain.
I let this cure over-night. Then I move onto a finer Rottenstone mixture. Again applying and rubbing with the grain, and wiping it off in the same manner.
Friday, April 25, 2014
Shellac Problems
I'm running into some issues with French Polishing on the LP Junior. Everything seems to be working out fine on the top and back. The shellac is smoothing out nicely and I will be progressing to the alcohol only steps soon.
But I'm running into two problems with the sides.
The first is a dry spot, that just does not seem to be taking the shellac at all. I have been over it several times slowly rubbing the shellac in, but the dry spot only seems to grow.
The second problem is residual darkening from drips when I was working on the top and the back. I've tried sanding back and then reapplying shellac, but I can still make out some of the spots. This is worse in the area around the neck and next to the dry spot mentioned above.
So after a lot of internet searches with no luck, I ran up to Woodcraft for some advice. The clerk who has been an expert on finishes in the past made a few recommendations. The darks spots are actually caused by thinned out shellac from the drips that seeped deeper into the pores. Then when I tried to add more shellac while working on the sides, it was a heavier weight. The pores of the walnut was not able to absorb the thicker shellac as well.
I was worried I would have to sand the shellac all the way back. Instead the person at Woodcraft recommended using just pure denatured alcohol to remove the shellac instead of sanding. After a few minutes of rubbing the alcohol in it removed much of the shellac. Then I followed up with a quick light sanding using 400 grit paper coated in mineral oil. I was then able to start french polishing again, but this time I started with a heavily diluted coat of shellac. After that sealed the sides I started using the heavier 3 pound cut I was working with before to build the layers.
Now this just leaves the issue of the dry spots. For this the issue the internet did seem to help a little as did my friend at Woodcraft. Fixing this will be a slower issue. The online source recommended slowly working around the edges of the dry spots and building up there. I believe the quote was something along the lines, "you have to sneak up on the dry spots in order to fill them. My friend at Woodcraft reminded about using mineral oil to keep the polishing pad well lubricated. Without the lubrication the cotton rag will heat up while rubbing and cause friction on the wood, there by pulling the shellac up rather than applying it. This will cause the dry spot to grow. So this is where everything stands at this point. I am slowly building the shellac up on these dry edges.
Saturday, March 1, 2014
LP Jr (Six) Final String Up Test and Grain Filler
So after leveling the frets, I decided to string Six up and test it out acoustically. Here's just a simple B minor chord progression.
And here is a little blues improv in E.
After taking of the strings and tuners it's time to fill the grain. I'm following the suggestion of one of the people at our local Woodcrafter. She suggested that because the grain is so fine that I could just use shellac. She recommended coating it on thickly. And then sand it back to the wood. I'll do the sanding tomorrow.
And here is a little blues improv in E.
After taking of the strings and tuners it's time to fill the grain. I'm following the suggestion of one of the people at our local Woodcrafter. She suggested that because the grain is so fine that I could just use shellac. She recommended coating it on thickly. And then sand it back to the wood. I'll do the sanding tomorrow.
Monday, February 24, 2014
LP Jr (or Six) Fretwork
So I'm closing in on the end for the LP Jr project. I've decided to refer to her as Six now, since she will be the sixth guitar that I've completed.
I have a few more tasks to complete before I can begin finishing the body. I wanted to get the frets seated and level them first. I had to bend the frets to tighter radius than the fretboard. The fretboard is a 12 inch radius (matching the bridge.) I bent the frets to close to 10 inches.
I over bend the frets because I will be using a hammer to seat them. As the hammer forces the frets into the slots it also flattens the radius.
With all the frets in place its time to clean things up.
First, I remove the overhanging edge pieces with a flat nose wire cutter.
Then I use a fine file, smooth the edges even with the side of the fret board. (I didn't take pictures of this portion of the process. I promise I will do that on my next build.) After the edges are smooth. I turn my file to a 30° angle and run it over the edges again, taking off more of the fret edges. This makes for a smoother playing neck.
Next, it's time to level the fretboard. First I tighten the truss rod slightly (maybe a quarter turn.) I take 320 grit sandpaper on my 12 inch radius fretboard leveling block and level the neck. This flattens the frets taking off any high spots. While doing this I will hold a straight edge to the frets looking for high spots that need more attention.
After I level the fret board it's time to put a crown back on the frets, or round their edges. First, I use a Sharpie marker on the flat edge of all of the frets, this helps me view my progress. (Yes, I did slip and mark up the fretboard at the 24th fret. I'll have to sand that mark off later.)
Next up, I use my fret file. It is a concave file that will round the tops of the flattened frets. By checking regularly I can watch the red marker slowly disappear leaving a round yet rough fret.
Next up I use 400 grit sand paper with a school eraser as a sanding block to take out some of the roughness. I use a metal fret guard to keep from scratching up the fretboard. I will polish the frets after I finish the body.
So now it's time to put everything together and see just what she's going to look like, and test how well she'll play.
I place al of the electronics in the rear cavity. This is a tight fit. On future builds I will route a larger electronics cavity.

The switches and knobs are a little closer than I would have liked. This would have worked out fine, except that I wanted to add two there-way coil tap switches for the pickups. I used two on/off/on DPDT switches for a Series/Single/Parallel wiring for each pickup.
Finally, it's time to string her up and see just how she plays. While most people might find the neck to be a little thick at the nut, I find that I like it that way.
I'll upload a video of me playing the guitar acoustically in a couple of days. It sounds and plays great, even at this rough stage.
I have a few more tasks to complete before I can begin finishing the body. I wanted to get the frets seated and level them first. I had to bend the frets to tighter radius than the fretboard. The fretboard is a 12 inch radius (matching the bridge.) I bent the frets to close to 10 inches.
I over bend the frets because I will be using a hammer to seat them. As the hammer forces the frets into the slots it also flattens the radius.
With all the frets in place its time to clean things up.
First, I remove the overhanging edge pieces with a flat nose wire cutter.
Then I use a fine file, smooth the edges even with the side of the fret board. (I didn't take pictures of this portion of the process. I promise I will do that on my next build.) After the edges are smooth. I turn my file to a 30° angle and run it over the edges again, taking off more of the fret edges. This makes for a smoother playing neck.
Next, it's time to level the fretboard. First I tighten the truss rod slightly (maybe a quarter turn.) I take 320 grit sandpaper on my 12 inch radius fretboard leveling block and level the neck. This flattens the frets taking off any high spots. While doing this I will hold a straight edge to the frets looking for high spots that need more attention.
After I level the fret board it's time to put a crown back on the frets, or round their edges. First, I use a Sharpie marker on the flat edge of all of the frets, this helps me view my progress. (Yes, I did slip and mark up the fretboard at the 24th fret. I'll have to sand that mark off later.)
Next up, I use my fret file. It is a concave file that will round the tops of the flattened frets. By checking regularly I can watch the red marker slowly disappear leaving a round yet rough fret.
Next up I use 400 grit sand paper with a school eraser as a sanding block to take out some of the roughness. I use a metal fret guard to keep from scratching up the fretboard. I will polish the frets after I finish the body.
So now it's time to put everything together and see just what she's going to look like, and test how well she'll play.
I place al of the electronics in the rear cavity. This is a tight fit. On future builds I will route a larger electronics cavity.

The switches and knobs are a little closer than I would have liked. This would have worked out fine, except that I wanted to add two there-way coil tap switches for the pickups. I used two on/off/on DPDT switches for a Series/Single/Parallel wiring for each pickup.
Finally, it's time to string her up and see just how she plays. While most people might find the neck to be a little thick at the nut, I find that I like it that way.
I'll upload a video of me playing the guitar acoustically in a couple of days. It sounds and plays great, even at this rough stage.
Next up, I will block sand the body flat, and seal the walnut pores with shellac. I mixed up a nice thick 4 lb. cut of shellac tonight. I had to go back and re-read this post in order to make sure that I had the correct ration of flakes to alcohol - 4 oz of shellac flakes mixed with 8 oz of alcohol.
Sunday, February 9, 2014
LP Jr. - Neck Pickup Route
This is a rough mock-up after today's work. I placed the chrome hardware in order to see how this will eventually look.
Now for today's work - routing the neck pickup cavity. This route on the Jr. presented a special problem. Because this is a set neck with a 4° tilt, the standard Stewart McDonald humbucker routing template would not easily fit over the top of the body. There were a couple different possible work arounds. The one that I chose was to build a custom template out of scrap wood.
As you can see, in order to use the StewMac template, I would have had to cut it to fit around the neck. But that still would not solve the problem with the thickness of the template. The fretboard sits almost 3 mm higher than the template.
The scrap wood sits a safe 4 mm higher than the fretboard. I then use the StewMac template to cut my own template.

I drilled two large holes before routing the template.
I then measured off width of the base of the fretboard.
I then cut into the template, so that I could fit it around the fretboard. I cut a center piece to help with deep routes for the pickup screws, brackets and springs.
One of the other obstacles for the neck pickup route was the overall depth. The neck tendon under the the curly walnut top is about 1 inch thick. I wanted to leave as much of this tendon in tack as possible. The top is about 1/4 inch thick. The screws and brackets need a depth of about 1 inch, but the pickups will only need about a half inch. So the wood block is placed in the center to control the amount of routing I do on the edges. After routing those two areas to slight deeper than 1 inch. I removed the bock and routed the rest of the pickup cavity to about 1/2 inch.
Subscribe to:
Posts (Atom)


